Setting up a Raspberry Pi NAT router can revolutionize your home network by providing a cost-effective and customizable solution. Whether you're looking to enhance your network security, control bandwidth usage, or experiment with advanced networking features, Raspberry Pi is the perfect tool for the job. This article will guide you step-by-step through the process of configuring your Raspberry Pi as a NAT router.
In today's digital age, having a robust and flexible home network setup is crucial. With the increasing number of devices connected to the internet, managing network traffic efficiently has become more important than ever. A Raspberry Pi NAT router offers a unique opportunity to take control of your network while learning valuable skills in networking and system administration.
From beginners to advanced users, this guide will cover everything you need to know about Raspberry Pi NAT router setup. We'll explore the necessary hardware, software configurations, troubleshooting tips, and best practices to ensure a smooth and successful deployment. Let's dive in!
Read also:Who Is Parker Schnabels Wife Discover Everything You Need To Know
Table of Contents
- Introduction to Raspberry Pi NAT Router Setup
- Hardware Requirements
- Software Requirements
- Installing Raspberry Pi OS
- Configuring Basic Networking
- Setting Up NAT
- Configuring Firewall Rules
- Advanced Configuration Options
- Troubleshooting Common Issues
- Conclusion
Introduction to Raspberry Pi NAT Router Setup
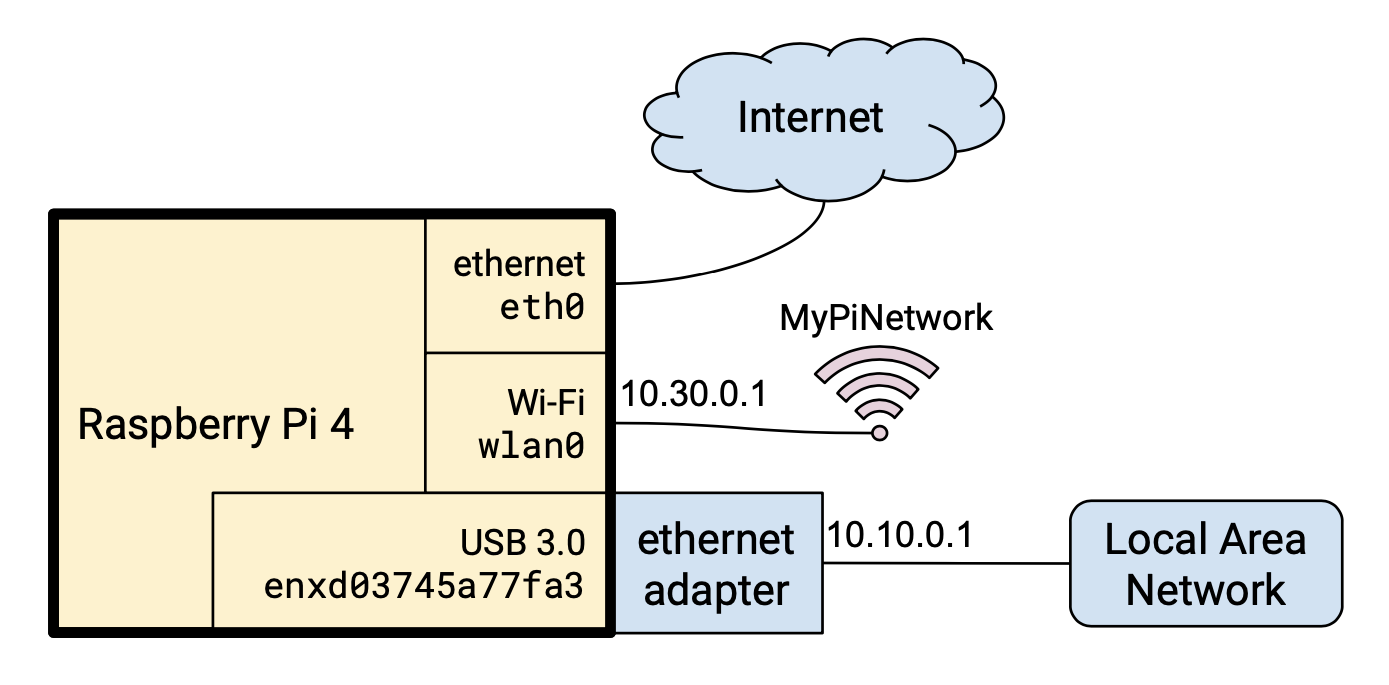
When it comes to setting up a NAT router, Raspberry Pi offers a versatile and affordable option. A Network Address Translation (NAT) router allows multiple devices in your home network to share a single public IP address, enabling efficient communication with the outside world. By using Raspberry Pi as your NAT router, you gain the ability to customize and optimize your network according to your needs.
One of the primary advantages of using Raspberry Pi for NAT router setup is its flexibility. Unlike traditional routers, Raspberry Pi allows you to install custom firmware and configure advanced settings that may not be available on standard hardware. Additionally, its low power consumption makes it an environmentally friendly choice for long-term use.
Hardware Requirements
Before diving into the setup process, it's essential to ensure you have the necessary hardware components. Below is a list of items you'll need:
Key Components
- Raspberry Pi (any model with Ethernet support)
- MicroSD card (minimum 8GB)
- Power supply for Raspberry Pi
- Ethernet cables
- Optional Wi-Fi dongle (for wireless connectivity)
Having the right hardware is crucial for a successful setup. Ensure that your Raspberry Pi model supports the required features, such as Ethernet and USB ports, to facilitate seamless network connectivity.
Software Requirements
Once you have the hardware ready, the next step is to prepare the software environment. Here's what you'll need:
Operating System
- Raspberry Pi OS (previously known as Raspbian)
Raspberry Pi OS is the official operating system for Raspberry Pi and provides a stable foundation for setting up a NAT router. You can download the latest version from the official Raspberry Pi website.
Read also:Duke Dennis Height Unraveling The Mystery Behind The Popular Content Creator
Networking Tools
- iptables
- dnsmasq
- hostapd (optional, for Wi-Fi support)
These tools are essential for configuring NAT, managing DNS, and setting up Wi-Fi access points (if required).
Installing Raspberry Pi OS
Installing Raspberry Pi OS is a straightforward process. Follow these steps to get started:
- Download Raspberry Pi OS from the official website.
- Use a tool like Balena Etcher to flash the image onto your MicroSD card.
- Insert the MicroSD card into your Raspberry Pi and power it on.
- Access the Raspberry Pi terminal via SSH or connect a monitor and keyboard.
After completing the installation, update the system to ensure you have the latest software packages:
Run the following commands:
sudo apt update
sudo apt upgrade
Configuring Basic Networking
Configuring basic networking is the foundation of setting up a NAT router. Follow these steps to configure your network interfaces:
Identify Network Interfaces
Use the following command to list all network interfaces:
ip addr
You should see interfaces such as eth0 (wired Ethernet) and wlan0 (Wi-Fi, if applicable).
Configure Static IP Address
To ensure consistent network connectivity, assign a static IP address to your Raspberry Pi. Edit the network configuration file:
sudo nano /etc/dhcpcd.conf
Add the following lines, replacing the IP addresses with your desired configuration:
interface eth0
static ip_address=192.168.1.1/24
static routers=192.168.1.254
static domain_name_servers=8.8.8.8 8.8.4.4
Setting Up NAT
Network Address Translation (NAT) allows your Raspberry Pi to act as a gateway between your internal network and the external internet. Follow these steps to configure NAT:
Enable IP Forwarding
Edit the sysctl configuration file:
sudo nano /etc/sysctl.conf
Uncomment the following line:
net.ipv4.ip_forward=1
Set Up iptables Rules
Use iptables to define NAT rules:
sudo iptables -t nat -A POSTROUTING -o eth0 -j MASQUERADE
sudo iptables -A FORWARD -i eth0 -o eth1 -m state --state RELATED,ESTABLISHED -j ACCEPT
sudo iptables -A FORWARD -i eth1 -o eth0 -j ACCEPT
Save the iptables rules to ensure they persist after reboot:
sudo sh -c "iptables-save > /etc/iptables/rules.v4"
Configuring Firewall Rules
A firewall adds an extra layer of security to your NAT router. Use iptables to define firewall rules:
Basic Firewall Configuration
Block all incoming traffic by default:
sudo iptables -P INPUT DROP
Allow established connections:
sudo iptables -A INPUT -m state --state ESTABLISHED,RELATED -j ACCEPT
Allow SSH access (optional):
sudo iptables -A INPUT -p tcp --dport 22 -j ACCEPT
Save the firewall rules:
sudo sh -c "iptables-save > /etc/iptables/rules.v4"
Advanced Configuration Options
Once the basic setup is complete, you can explore advanced configuration options to enhance your NAT router:
Setting Up a DHCP Server
Install dnsmasq to configure a DHCP server:
sudo apt install dnsmasq
Edit the dnsmasq configuration file:
sudo nano /etc/dnsmasq.conf
Add the following lines:
interface=eth1
dhcp-range=192.168.2.10,192.168.2.100,12h
Enabling Wi-Fi Support
Install hostapd to set up a Wi-Fi access point:
sudo apt install hostapd
Edit the hostapd configuration file:
sudo nano /etc/hostapd/hostapd.conf
Add the following lines:
interface=wlan0
ssid=YourWiFiName
channel=6
wpa=2
wpa_passphrase=YourWiFiPassword
Troubleshooting Common Issues
Even with careful planning, issues may arise during the setup process. Here are some common problems and their solutions:
Network Connectivity Issues
If you're unable to connect to the internet, verify the following:
- Check the network cables and connections.
- Ensure the static IP address is correctly configured.
- Test the NAT rules using the ping command.
DHCP Server Not Working
If devices on your network are unable to obtain IP addresses, check the following:
- Ensure dnsmasq is installed and running.
- Verify the DHCP range in the dnsmasq configuration file.
- Restart the dnsmasq service: sudo systemctl restart dnsmasq
Conclusion
Setting up a Raspberry Pi NAT router offers numerous benefits, including enhanced network security, flexible configurations, and cost savings. By following the steps outlined in this guide, you can successfully deploy a NAT router tailored to your specific needs. Remember to regularly update your software and monitor your network for optimal performance.
We encourage you to share your experience with Raspberry Pi NAT router setup in the comments below. If you found this article helpful, consider sharing it with others who may benefit from it. For more in-depth guides and tutorials, explore our other articles on networking and Raspberry Pi projects.